
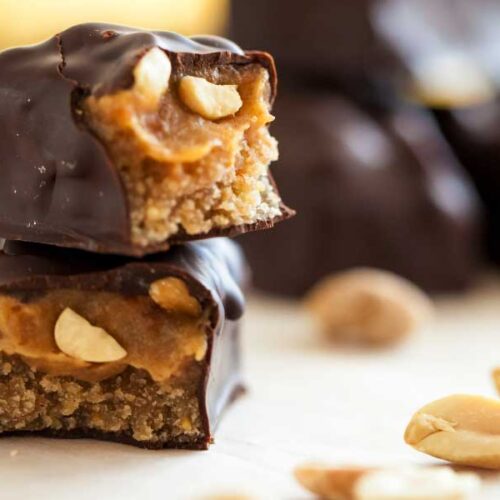
This week’s recipe is Raw and Chocolate Covered Protein Bars for your snacking enjoyment! This recipe produces protein bars uncomplicated to make and delicious to eat. You simply pulse the ingredients in a food processor, press the batter into a flat dish, then refrigerate. Homemade protein bars are prefect for when you need a healthier boost of energy before or while being active!
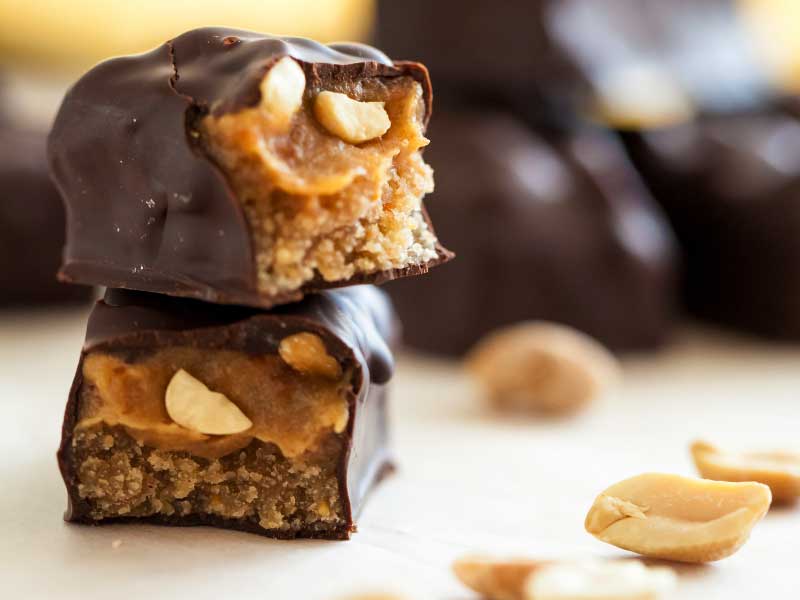
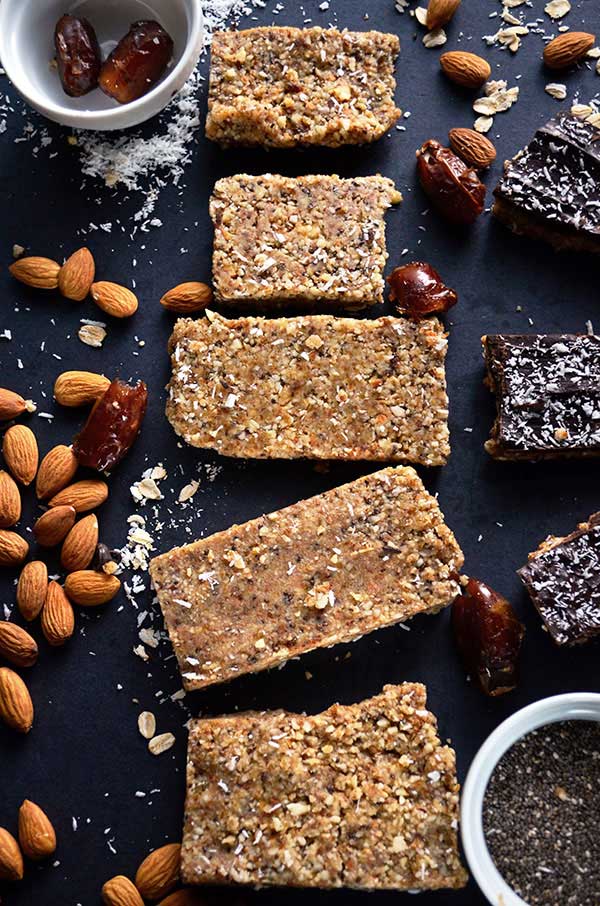
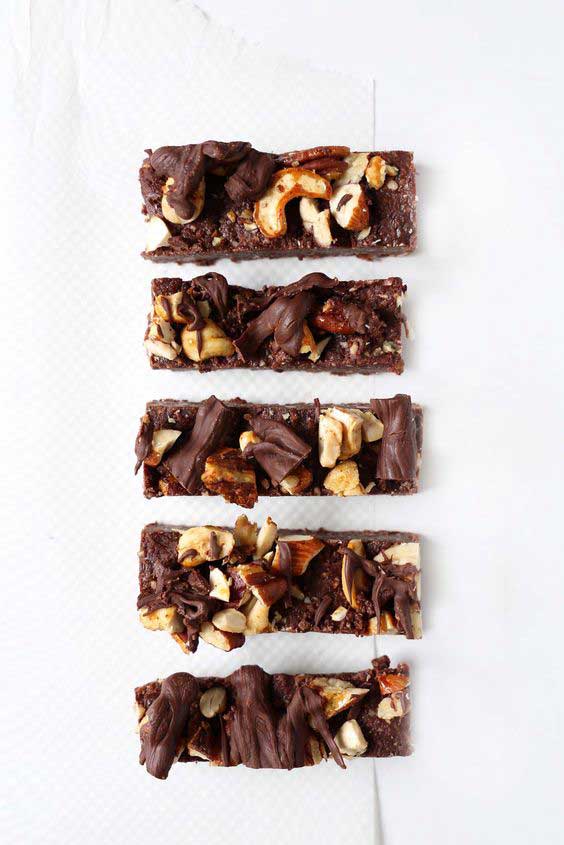
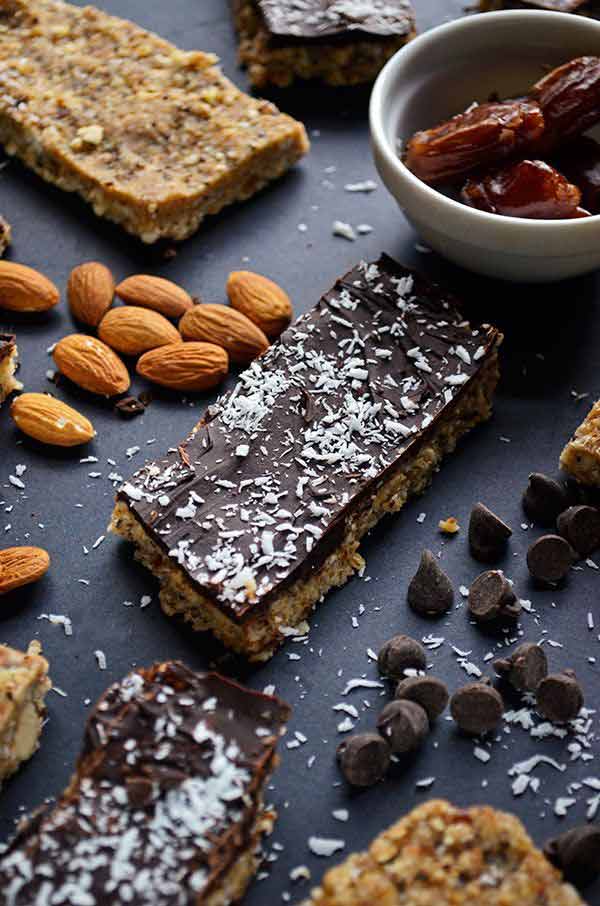
Dates, almonds, chia seeds, coconut oil, and oats make for the base of my bars. I added vanilla extract for flavor, pink himalayan salt for saltiness, and maple syrup for additional sweetness. That’s it folks, those are the ingredients for the Raw Protein Bars! Feeling fancy? Top them with melted dark chocolate and shredded coconut for extra pizazz!
Protein bars are a dime a dozen at the super market. Certain brands label themselves as healthy but manufactures still add sugar and preservatives to extend it’s shelf life. I read nutrition labels that boast organic oats, organic almonds, and organic milk from a virgin maiden’s teet. I made up the last ingredient, but what good does healthy ingredients do if you’re adding an ungodly amount of sugar to make it taste better?
I’m not a perfect eater but I strive to bring you recipes made from scratch. If you’re going to be active and prefer eating a snack made with natural ingredients, try these Raw and Chocolate Covered Protein Bars! I think you’re going to enjoy them.
Speaking of being active…
I’ve enjoyed working out as far as back as I can remember. I played sports in high school and enjoy riding my bike, workout DVD’s, tennis, and hiking. Since moving to the Pacific Northwest Kieran and I average 2 hikes per month. 2 hikes per month doesn’t sound like much, but it’s more than the 0 hikes per month we averaged while living in Chicago.
My main form of exercise in Chicago came from workout DVD’s or riding my bike. We left the city a few times to explore nature, but the travel times to reach our destination would be 2 hours at the very least. Once we drove to Starved Rock State Park hoping to hike through beautiful rock formations. Unbeknownst to us a storm passed through making 95% of the trails impassable. The trails open to the public were either 12 miles long or 1 mile long. We didn’t bring enough protein bars and water to hike 12 miles so we opted for the 1 mile hike instead. After driving 4 hours (round trip) our hike lasted 15 measly minutes. Let that be a lesson to anyone new to hiking, do some research before hitting the road!
Chicago itself has a variety of trails through parks and the lakefront. Trouble is those parks and the lakefront are only enjoyable 4-5 months of the year! Unless you’re a hard core cyclist you wouldn’t dare brave the cold, harsh winters for a bike ride. I relied on workout DVD’s to stay active during the winter. Once summer hits Chicagoans flock to Lake Michigan by the thousands. Cycling along the lakefront is amazing, you enjoy epic views of Lake Michigan as far as the eye can see. But if you want to completely submerge yourself in nature? You’re forced to drive for hours to escape the metropolitan area. We enjoyed biking Chicago’s lakefront and within the city itself but our weekend adventures were stale.
Little did we know what our new life in another state had in store.
Soon after moving to Oregon, Kieran and I hiked for the first time in our new state. We found a trail 10 minutes away from our apartment. The 5.6 mile trail winds through the west hills of Portland with an elevation gain of 930 feet, to the historic Pittock Mansion. Upon reaching the top you’re exposed to panoramic views of Portland, with Mt. Hood looming in the background. We suddenly found ourselves smitten with hiking and longed for more.
I quickly found a Facebook group called “Hiking in the Pacific Northwest”. The group members’ post pictures and locations of their recent hike(s). The imagery produced by this group was astounding. I would scroll through the group photos and think, “WOW, where is THIS hike located?” I discovered some of the most gorgeous hikes were within 60 miles (or less) from our house! Kieran and I were giddy with the prospect of new adventures. To this day I use “Hiking in the Pacific Northwest” for inspiration when we want to explore the great outdoors.
We’ve hiked so much we developed a morning ritual before each hike. We set our alarms for 7:30am the morning (and snooze like a mutha fucker). Once we’re up and moving I’m responsible for food and Kieran is responsible for our collecting the equipment we’ll need.
Kieran gathers our daypacks and fills our camelbacks with water. He then prints out directions and topographical maps of each hike. Neither of us have cell phone service on these hikes so it’s best to come prepared with a paper map!
My expertise is in the kitchen. First I concentrate on making breakfast and coffee, then I’ll pack the food we’ll eat on the trail. I pack 2 protein bars (each), a banana, and a larger item like a sandwich or a taco. My favorite is the taco. To save time I precook a seasoned chicken breast and slice onion and red pepper the night before. The morning of the hike I slice up an avocado, a few grape tomatoes, and cooked chicken breast. I assemble those ingredients, along with the onion and red pepper on top of a flour tortilla. Finally I sprinkle shredded cheese (if we got some), add a couple dashes of hot sauce, and wrap each taco in tin foil. I also pack a paper or plastic bag for garbage and some paper towels for clean up.
We’re normally ready to leave the house by 9-9:30am. Upon arrival to the trailhead we consume one of our protein bars. An hour or two into the hike we’ll eat our tacos. After the hike we’ll eat the banana. The 2nd protein bar doesn’t normally get consumed unless we’re really peckish, but it’s nice to have it just in case!
Clif Bars are my favorite store brand protein bars, however I’m excited to replace them with my homemade Raw and Chocolate Covered Protein Bars!!
If you love protein bars, here are reasons you should make Raw and Chocolate Protein Bars at home:
- It’s Cheaper –
Most grocery stores have bulk sections, some better than others. The organic grocery store I shop at (New Seasons) has chocolate chips, almonds, oats, dates, shredded coconut, and maple syrup in their bulk section. I bought the exact amount of ingredients I needed for this recipe and saved money doing so. - It’s healthier –
Organic and healthy protein bars CAN be found on the market, but the good ones are expensive. Unless you want to spend your entire savings at Whole Paycheck Foods (see reason #1) make healthier protein bars at home! Most store bought protein bars contain high fructose corn syrup and other unnatural chemicals to prolong it’s shelf life. My protein bars use nothing but the good stuff baby! - It’s quick-
Well mostly quick. Making the dough takes 5 minutes, but setting the dough takes about 4 hours. I make the protein bars before I go to bed so by the time I wake up, it’s go time! - It’s easy –
Here’s what you do. Grind the almonds into a flour first, small chunks of almonds are fine. Once the almonds are ground up, throw the remaining ingredients into the food processor. Whip all the shit together until the ingredients are well combined. Press the dough into a parchment lined dish (flat bottom works best for me), cover, and refrigerate. - They are freezable –
If you’re going to eat them within a few days you can store the protein bars in the fridge. I made a bigger batch and froze them, they last for about a month in the freezer. - They are delicious –
Keep in mind my bars are not overly sweet. If you’re a stickler on sugar the dates supply all the sugar the recipes needs. If the bars are not sweet enough, add honey, maple syrup, agave nectar, whatever you like. Store bought protein bars are too sweet if you ask me, my bars have a subtleness that I prefer. I feel the flavors of dates, almonds, oats, vanilla, and maple syrup combined together taste amazing. If you feel the dough is too bland, you can add whatever you want! Add different nuts, dried fruits, different chocolates, and/or peanut butter to customize your bars to fit your preference.
The above reasons make these Raw and Chocolate Protein Bars worthing giving a shot!
Note, these protein bars are high calorie and have a decent amount of (good) fat. I don’t suggest downing an entire plate of bars while watching TV. These protein bars are meant to be eaten when before, during, or after being active!
Get out and enjoy the fresh air dear readers, just don’t forget to take along this amazingly awesome snack ?
Thanks for stopping by,
Christina
Raw and Chocolate Covered Protein Bars
Ingredients
Raw Bars:
- 12 dates, pitted
- 1½ cups almonds
- ¼ cup oats
- ¼ cup coconut oil
- 1 tablespoon chia seeds
- 3 tablespoons maple syrup
- 1 tablespoon vanilla extract
- 1 tablespoon salt (I love
Chocolate Covered Coconut Bars:
- 1-2 cup melted dark chocolate chips
- 1 cup shredded coconut
Instructions
Making Raw Protein Bars:
- Add the almonds to your food processor and pluse them until they're broken up, almost into a flour (having small bits of almonds is OK too).
- Now add the remaining ingredients and grind together until everything is well combined and comes together like dough.
- Line a flat bottomed square dish/pan with parchment. Press the dough into the dish to form an even single layer.
- Cover and refrigerate the protein dough for 4 hours so they set, then you can slice them into bars. The protein bars will last a few days in the fridge or you can freeze them for a month.
Making Chocolate Covered Coconut Bars:
- Using a double boiler or a microwave, melt the dark chocolate. Let the chocolate cool off for a couple of minutes. Pour the melted chocolate over the dough you already pressed into the flat bottom dish/pan. Use a spatula to spread the chocolate evenly over protein dough. Once the chocolate is evenly spread out, sprinkle the top with shredded coconut.
- Cover and refrigerate the protein dough for 4 hours so they set, then you can slice them into bars. The protein bars will last a few days in the fridge or you can freeze them for a month.
Notes
12 dates -276
1 1/2 cups whole almonds – 1,240.50
1/4 cup oats – 73
1/4 cup coconut oil – 470
1 tablespoon chia seeds – 69
3 tablespoons maple syrup -156
1 teaspoon vanilla extract – 12
1 teaspoon salt (I love pink himalayan salt) – 0 Whole batch – 2,296.50
Cut into 6 bars – 383
Cut into 9 bars – 255
Cut into 10 bars – 229.65 Chocolate Covered Coconut:
1-2 cups melted dark chocolate chips – 1608
1 cup shredded coconut -283 Whole batch – 4187
Cut into 6 bars – 698
Cut into 9 bars – 465
Cut into 10 bars – 419 *Note, I am not a nutritionist, nor am I pretending to be. I found the calorie counts by reading the nutrition labels on the food I purchased, searching Google, and using my Lose It! app on my phone.